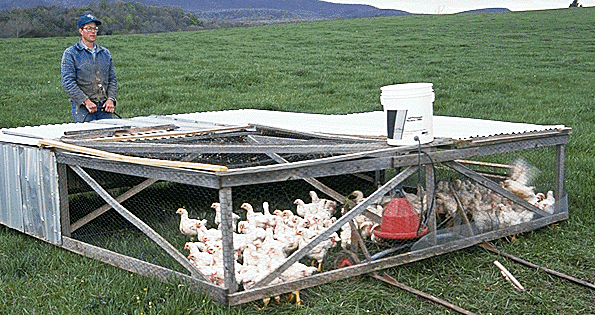
Showing posts with label broilers. Show all posts

Thursday, June 7, 2012

Transport Crate Build

Finally got off my butt yesterday and built some crates to transport the chickens to the processor (tomorrow). It was a little harder to get started than I expected because 10 days ago I cut the tip of my thumb really bad on the table saw. Hence I have been a little leery to use any saws at all much less its difficult to do anything without using your thumb. Anyhow, here is what I ended up with.


I had to do this job on the cheap cause I am broke. I had purchased the sheet of 7/16" OSB and four 2x4's a week or two ago when I had a few bucks. I was going to buy a bundle (50) of 1/4x1-1/2x48" lath for the slats but decided to use some leftover scraps of 5mm plywood I had from a previous job. I had 3 odd shaped pieces that I thought would be plenty but wound up short by a bunch and had to tear into a good sized 1/3 sheet of the same material. I was surprised by how many slats were needed for 3 crates.


The basic size is 24x32" so that I could get all 6 top and bottom pieces from a single sheet. For the 2x2 vertical supports I ripped a couple of the 2x4's in half and cut them 11-1/2" long (6 per crate). And the slats are 1-1/2" wide by 24" for the ends and 32" for the sides. There is about 5/8" gap between the bottom and the first slat so that I can hose them out and allow stuff to flow out. I also scabbed a couple of 2x2 on the bottom so that they can be stacked without hitting the hardware. Of course as usual I had to glue and screw everything. The slats are glued and stapled with two 1" staples on each vertical support.


I continued on the cheap with all the "hardware" by using stuff I already had laying around. The only thing I had to buy were the hinges and I opted to use one each instead of a pair and saved $5. The wood latch is just a piece of the slat plywood that pivots on a screw. And the handles are just some small pieces of rope with a knot on each end.


The paint was just to make hosing them out easier and make them last a little longer. OSB doesn't fare too well in the weather. All in all, not to bad of a job on a budget. The plastic crates available on the internet are ridiculously priced around $100 or so. I am taking about 22-24 chickens to the processor tomorrow so I figured that 3 crates would be enough as they should comfortably hold 8 chickens each.

Today I am withholding all food from the chickens to clean them out before processing. It was nice to have a break from moving the hoop house and feeding them. All I had to do was fill the water bucket. They kinda looked at me expectantly and were a little confused why I didn't move them to fresh grass. I hope the roosters enjoyed their last meal. I know I will enjoy my first chicken dinner this weekend.

Tuesday, June 5, 2012

Week 11 - Nearing the Finish Line

Wow the chickens have really filled in and are looking great. They are about the same size as my 2 year old layers. I am confident that I can finish off the roosters early which is a good thing because they are starting to crow, and peck each other more--and I don't have much feed left. I went ahead and bought one bag of scratch corn to help stretch the feed and to put a little fat on them.


Mr. Curious here is gonna be Mr. Chicken Dinner pretty quick. I can't believe they are only 10 weeks old.

Yesterday I was able to schedule a day to process the roosters. Mary at The Hen Connection recommended that I try Country Side Poultry Processing in Fruitland. The owner was very nice on the phone and their prices are pretty good, only $2.50 per chicken or $2.85 with a cryobag. I think the cryobag is worth the small additional costs so I will go with that. So this Friday, June 8th the roos will be taking a one way trip to the freezer. I will follow up with a post about how the processing went.

Now I need to get busy and build a few transportation crates to take them in. I am going to use the basic plan from APPPA but modified a little to get 3 crates out of a single sheet of plywood, two 2x4s and a bundle of lath. I will use a sheet of 7/16" OSB and paint the smooth side white to keep the top cool and the bottom easier to clean after use. I will just rip the sheet of OSB in half down the length and in thirds across it giving me 6 pieces just shy of 24x32", which should easily hold 8-10 chickens. I always rip 2x4's in half instead of buying 2x2's because they cost the same and I get 2 for the price of one and the 2x4s are better quality. I will cut them into 11 or 12" pieces for the vertical supports. I think that 6 per crate is enough, but may have to add more depending on the sturdiness of the lath. 4 pieces of lath across each side should be plenty.

Thursday, May 17, 2012

Week 8 - Routine

Well both I and the chickens have finally settled into a regular routine. I take care of them twice a day, usually 8:00am and 4:00pm. Move the hoop house, fill the water bucket, fill the feed trough. The chickens are eating less feed and more grass now so that there is a little bit of feed leftover, and when I fill it up they don't go into a feeding frenzy anymore. In fact usually just a few at a time will eat the feed while the rest peck at the grass and weeds.

Speaking of grass and weeds, what is left of my "pasture" is mostly weeds and very little grass. I have seeded it three times now but not much seems to grow but cheat grass and weeds. At least the goats and the chickens are keeping it ate down and I don't really have to mow it anymore. This fall I am going to put in sprinklers if it kills me. Right now I am dragging around hoses and two tower sprinklers, but I don't like running them all the time off my well pump. I really need to get an irrigation pump and hook into that. Hopefully next spring the pasture will be in better condition.

Anyhow, if the chickens are on a patch with very little grass, I move them one extra time per day, usually around noon. Here are some pictures I took this afternoon just after moving the hoop house, and as you can see they are happy as clams to get to new ground.


Mr. White is always at the center of attention. Plus he is easy to photograph cause he makes a great target in the sea of meandering reds.


Here is a very curious Roo. The chickens are getting used to me coming inside twice a day and don't run away or panic much anymore. I can usually even pet them for a second or two before they squawk and run.  This guy came right up to me and almost stuck his beak into the camera.


The other morning at first light one of the Roos made a (feeble) attempt to crow. He hears my neighbors roosters and is trying to copy them but it sounded more like a wounded cat than a "cock a doodle-do".

I discovered a couple new mole hills in the pasture this week. So yesterday I got the hose, put it in the hole and flushed out the mole, and got it into a bucket, and filled it with 6 inches of water. They only struggle for less than a minute. Seems like a simple, clean and humane way to get rid of them before they make an utter mess of the ground. Much easier than traps and smoke bombs, never had any success with those. I had an infestation of them on the other side of my property several years ago and didn't know how to get rid of them, so now that section of ground is all uneven and rutted which makes it a pain in the butt to mow. So I now have a zero tolerance policy for moles.


Here is a good example of a pretty pullet. They seem to be lighter in color and with less black in the feather tips.


The Roo's are definitely bigger than the pullets and will probably get processed a week or 10 days before the pullets do. I probably need to start thinking about scheduling the processing and start working on building some transportation crates. That will probably be my next project.

Tuesday, May 8, 2012

Week 7 - Half Way There

Well the chickens have reached the half way mark. Not much to report this week as it has been mostly uneventful. Except for yesterday morning when Granny Goat somehow nosed her way into the hoop house while I was filling the water bucket and spilled the feed that I had just filled up all over the ground, and the water overflowed everywhere while I was trying to get that stupid goat out without causing a panic and trampling my chickens to death. I could have killed her then and there. Oh well.

Here are some pictures of the chickens I took today as they turned 6 weeks old.

This is Mr. White, as he is the only white bird I have. Oddly enough he is pretty high on the pecking order and commands a little respect from the others.


This is Mr. Brown as he is the darkest colored bird I have. 


The rest of them fall somewhere in between and look like this in coloring. 


This here is Mr. Waddles, as he is the one chicken with messed up legs.


He can waddle around bow legged but prefers not to and mostly lays around. Not sure why this happened to him but he has been this way since week 2 or 3 back in the brooder box. I remember when I saw his legs that I changed the starter feed from 25% to 23% protein because I was afraid they were growing too fast to support their little legs. Odd thing is that his legs and feet are abnormally large compared to the others. I wish I knew what causes this so I can prevent it in the future. If he stays the same he might survive to processing but I am not betting on it at this point.


Anyhow, at the rate they are consuming feed, the 300 lbs. of Grower will not last through 8 weeks. So I ended up buying another 100 pounds today. All told I figure they will go through:
  • 100 lbs. of Starter (3 weeks)
  • 400 lbs. of Grower (5 weeks)
  • 600 lbs. of Finisher (4 weeks)
That's about $350 in feed alone, which is almost $8/bird if 45 survive to processing, which is another $3/bird for a total of $11/bird (not including electricity for heat lamp, gas for transportation, bedding for the bedding, etc.) I figure $3.50/lb. is about as cheap as I can sell them just to break even on each bird. Of course we are going to keep half of them for ourselves, so while we will lose money on those birds, it will be offset by not having to purchase any chicken for a year. Next time I will buy 1000 lb. totes of Grower and Finisher and raise 2 batches about 4 weeks apart to save a little money on feed.

Thursday, April 5, 2012

Week 2 - Problems

The morning of day 7 or 8 I found a second dead chick in the brooder box. Others looked sickly and one in particular was very lethargic. The chicks looked bloated and unclean, and some of them had poop stuck to their butt. I pulled out one chick that looked bad and my wife and I cleaned him up real good, as he had poop all under his wing and it was getting nasty.

Worried that we would lose more chicks I called my chicken friend, Mary at The Hen Connection. She immediately came over and took a look at the chicks. First order of business was to with hold food for 4 to 5 hours as they were apparently eating themselves to death. Second we cleaned all of the "poopy butt" off of the chicks. If it hardens on the chicks, they cant poop and will literally explode inside. Yuck! Then we decided to lower one of the heat lamps an inch or so to keep it warmer in the brooder box. But the most important decision was to with hold the food at night to keep them from over eating, especially on 25% protein BTG starter feed.

LESSON LEARNED: With hold food at night with meat chicks.

As expected the lethargic chick died that afternoon, and I gave one chick to Mary so that leaves 46. But I am happy to report no more losses since, and they are looking great now. No more poopy butt or severe bloating. And they are feathering out nicely.

By day 12 the pine shavings in the brooder box were getting gross so I cleaned them all out and added some fresh shavings, but I need to buy another bag and do it again soon. The chicks are so big that they are making a huge mess, and I have to check their food and water 3 times a day now. This guy is a huge for his age.


Sunday, April 1, 2012

Week 1 - The Chicks Are Here

DAY 1


I got the call from Pine Pride Hatchery this last Tuesday (3/27) that my 50 Red Star Ranger chicks were ready to be picked up. I really wasn't expecting them for a few more days so I was a little unprepared. Since I was in the middle of a construction project in the garage, I decided that the brooder box needed to be moved into the shed. This was a good decision in hind sight since it is secure and draft free, no loud noises like power saws, no paint or car fumes, etc. Moving that box by myself however was no small feat. Thank God for the wheels that got it 90% of the way. I added pine shavings, set up the feeder and watering jar, and turned on the heat lamps.

I picked up the chicks from the hatchery mid afternoon and the drive back home was uneventful except for some occasional peeping. My wife helped me put the chicks into the brooder box, one at a time and gently dipping their beaks into the water trough. I have read that this helps them to know where the water is. Of course my wife took about 5 minutes with each chick giving them lots of love and cooing over them. Telling her that we were going to be slaughtering and eating them in 12 weeks didn't seem to matter much to her. Just wait till they are big enough to start making a huge mess and then we will see how cute they are. Anyhow here are a few pictures from day one.


Okay so they are pretty cute now. But I know whats coming soon. Poop, and lots of it. 

DAY 3


The chicks are doing well. No dead or sickly chicks, and the temperature must be good cause they aren't bunched up or keeping away from the heat lamps. I cannot believe how active they are, running back and forth from the heat lamp to the food and water. I also put some branches in for them to climb over and to roost on. They are very curious little guys. They love to peck the plastic thermometer (probably because it has a large red indicator) and seem fascinated by it. I am also amazed how at just a couple days old they instinctually act just like my adult hens, preening themselves, scratching the ground, backing up and looking down for something to eat, etc. I could swear that they are bigger too. Most are starting to develop their wing feathers.


DAY 6


This morning I found one dead chick. I expect to lose about 5 chicks so this is no surprise, but what is surprising is that we haven't lost any until today. I think its my fault though because I had to go and monkey with things yesterday. I decided to put the heat lamps on a chain so that I can adjust the height easier than with them sitting on the lid, especially when the lid gets opened. Since they seemed to be doing so well and not staying under the lamps very long, I removed the second lamp. It was a really nice warm day too so I opened the window on the shed. Well last night a storm rolled through and I forgot to shut the window, so they probably got too cold and one of them bought the farm. I put the second heat lamp back up this morning.

LESSON LEARNED: Too hot is better than too cold. If the chicks can move away from the heat lamp, leave them alone.

Also they are going through more food now. This morning the feeder was empty. As soon as I filled it all 49 chicks were going like gangbusters trying to eat. I realized that I need another feeder. I added another small feeder until the frenzy was over. I will be buying another large feeder this afternoon, and I guess I need to check and fill the feeder more than once a day.

The chicks are getting much bigger too. The wing feathers are filling in and now I can see tail feathers starting to come in as well. This big guy is a good example.


Tuesday, February 28, 2012

Where's the Chicken?!?

For the last year and a half I have been raising a handful of hens for eggs. I started with 5 pullets (2 Rhode Island Reds, 1 Golden Sex-link, and 2 Plymouth Bared-Rocks) in expectation of gathering a few eggs each day. Not enough to sell but enough to feed our family and occasionally give some to friends.


The goal was to allow them to free-range during the day on our 3 acre yard and return to a coop for laying and roosting at night. What I quickly learned is that everything loves to eat chickens, including several neighborhood dogs. I have had to replace 2-3 hens at a time on 3 different occasions now, and have spent hundreds of dollars on fencing. Currently we are down to 5 hens, none from the original 7, but we are getting an average of 4 incredibly delicious eggs every day.


Living in a rural community we have been spoiled with grass-fed beef grown and butchered locally. But we eat a lot more chicken than beef. Last year we bought several whole chickens from a friend that raised them as "All Natural" without hormones or medications and fed an all vegetable diet. This year I have decided to try raising some meat chickens ("broilers") on our own. After doing some research I decided to try the "Pastured Poultry" method as promoted by Joel Salatin.


I am planning to raise a single test batch of 50 chicks on one acre of fenced pasture with a movable 8x12' hoop house shelter. I would like to keep half of the processed chickens for our family and then sell the rest to recover some of the expenses. If all goes well I will consider expanding to second batch later this year, or maybe 2 to 3 staggered batches next year.

I think the deciding factor will be if I can break even or not and still provide some good quality meat for my family and friends. I know that with initial start-up costs (hoop house, brooder box, losses from inexperience, etc.) that will not happen with this first test batch of only 50 chicks. I am pretty sure that I will have to buy feed in bulk (1000lb totes) to get the price down enough to make this a practical venture. But I am unsure how many chicks will survive to processing, how much feed each will eat, or how many chickens one acre can support at a time or how long it will take the pasture to recover between batches. That is why I will be tracking all of this here, and sharing my experience and lessons learned with any one else that may be considering raising broilers.