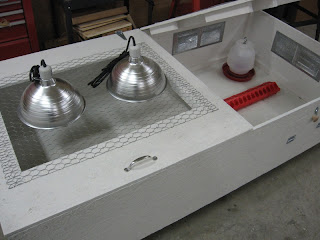
Here is the brooder box that I built for the chicks to live in for the first 3-4 weeks. The purpose of the brooder is to keep the chicks warm (as a brooding hen would do in nature) with a heat lamp, which will be suspended over the chicken wire lid on the left half of the box. The right side of the box will give the chicks a place to be away from the heat lamp if they get too warm, and will contain a feeder and water jar. The whole box will have about 3" of pine shavings on the floor for the litter. I painted it with Kilz primer for now so that it won't rot or swell and I can clean it out easier.
The materials, dimensions and design were mostly a product of what I had laying around. I wanted to make something that would be completely self contained rather than just a border on the floor. This will allow me to move it if necessary and not have to worry about curious dogs, children, etc.
The one consideration that I had to make was how big to make the box. I determined that 1/2 sq. ft. per chick should be sufficient for the first 4 weeks or so. With 50 chicks that means 25 square feet, which is 5 foot square. I had several pieces of 1/2" OSB about 3' x 6' from window cutouts on a construction job, so I ended up making the box 3' wide, 6' long and 16" deep. That's only 18 square feet so I hope there is enough room by the end of 3 weeks. Hopefully the chicks will feather out quickly.
Notice that I placed close-able vents on the right side of the box for added ventilation. I hinged the cutouts so that they can be closed up if it is too drafty. Again this is the product of what I had laying around. These are some soffit vents that I found in the shed and I have been saving those wooden knobs forever so it was time to use them.
The chicken wire on top of the lids was the leftovers from a 2' wide roll so that dictated the lid cutout to be about 20" (enough to overhang and staple the chicken wire 2" on each side). I didn't have any pieces of OSB left over that were big enough to make the lids out of so, I had to piece it together and put 1x2 pine braces underneath the joints (glued and screwed). Even if they were out of one piece I still probably would have braced it because OSB isn't very strong (and I over build everything, its a disease.)
I did have to buy all the hinges and some other hardware. Unfortunately nobody seems to make hinges the way I wanted them. My lids lay on top of the box so an inside hinge would not provide enough clearance to open it. The wood is only 1/2" thick so I couldn't use a piano hinge between the lid and wall without adding additional material to have something to screw it to. The strap hinges that I used work fine on the outside, but the screw holes were too close to the hing point as I needed an extra1/2" to miss the lid. Thus I ended up drilling another whole (for the screw below the empty hole) in each hinge. And the screws that came with the hinges are too long and needed to be replaced with some 1/2" long screws.
My father in his infinite wisdom keeps telling me to "put wheels on it". I keep telling him that it is a "table top" box that doesn't need wheels as it won't ever be on the ground and that it is light enough that I can move it by myself. Well I guess it could just as easily sit on the ground as it does on a table or saw-horses. But now that I have added lids and hardware, it is getting a lot heavier. Add pine shavings and 50 chicks and I think it will become a permanent fixture. Maybe I do need to add legs and/or some wheels. The real question is, where do I store this monstrosity when I am not using it?
[UPDATE]
Okay, so maybe wheels were a good idea. After moving this monstrosity in and out of and all around the garage every time I needed to build some thing in there I decided that dragging it around on saw horses was way worse than admitting defeat and adding some wheels. Since I still want the bottom to be flat I just built a large "movers dolly" for it to ride on. So far it works great.
Here is the finished product (sitting on the wheel dolly) with everything except pine shavings, and chicks.


No comments:
Post a Comment