Monday, March 12, 2012

Automatic Feeder

This was a little project that I built over the last couple days. It has nothing to do with the Freedom Ranger Project, as it is intended for just for my laying hens. I am tired of the wild birds eating my chicken feed. I saw a couple of these automatic feeders online and decided to try building one myself.

Here is a set of free plans and instructions: http://www.woodworkingcorner.com/feeder.php
I used these plans as more of a guide and changed some of the dimensions to suit my needs, mainly making the entire feeder wider to accommodate more chickens at the same time.


The idea is that the chicken(s) must step on the treadle which then opens the lid exposing the feed. Wild birds aren't heavy enough to open it. With the linkage at its current setting, it takes about 2-1/2 lbs. to open. That is a very large russet potato (from last years garden) on the treadle, it probably weighs about 1-1/2 lbs which isn't enough to open it, but with two of them (about 3 lbs.) it opens.


I built it out of some left over half inch plywood and cedar fence boards. I love using the 1x6" dog-eared cedar  fence boards cause they are super light and naturally weather resistant, and they are pretty cheap at $1.50 or so each at Home Depot. Since I usually only need a handful at a time I can sort through the stack and pick out some nice solid heart wood with sound knots. I will probably paint the plywood and stain the cedar.


The hardest part was the linkage. I just kind of guessed at where to put the pivot holes for the feed lid and treadle arms. Then I played with various lengths and position of the connecting piece until I got the travel I wanted. If you click on the picture you can see that I drilled a few test wholes on each arm. I am still a little worried about the how steep the angle is on the treadle in the full open position (which is about the same as the roof at 19 degrees or 4/12 pitch)


Here is a view with the roof lid off. I made the feed compartment angled so that it would push out toward the front. I will not finish the inside at all so that nothing contaminates the feed. If you are interested on the exact measurement or a plan, email me and I will send you a measured drawing.

Friday, March 9, 2012

Finally Finished Fencing the Field

Well its been 3 years in the making, but it is finally done (save for a few more U-nails). This is the "pasture" area (almost an acre) that I plan on keeping the meat chickens in to protect them from predators (mostly neighbor hood dogs, like the 2 killers across the street.) Today I hung the main gate and stretched the last section of field fencing from the gate post to the corner post. What a pain! Of course it would help if I didn't make custom cabinetry out of everything (yes that is a 45 degree miter on the top rail in the corner).


I don't know how farmers and ranchers notch out the flat spots on the top rail where it sits on the posts (probably with a chain saw), but the way I do it takes forever! I built a jig for my skill saw that keeps it 3-1/2" off the table surface. I cut the top rail to length, flip it upside-down, then make several relief cuts with the skill saw jig 3" in on each end and 6" wide for the middle post, and clean it all up with a hammer and chisel. I clamp a 2' level on the first flat spot I cut out, then make sure it reads level before sawing out the other two flats. I will post some pictures of this process later.


Yesterday I spent most of the day staining the gate that I made out of cedar lumber about 2 years ago. I wish I had stained it then. Its been leaning up against the house all this time and one side is gray weathered while the other side (of course the back side) looks like it did the day I built it. After staining I stapled on some leftover 2" welded wire which just barely fit. Then I went to hang it and discovered that in my over-building cleverness that the hing strap placement wasn't going to work. (see the 3 holes just above and below the straps.) So I spent all morning re-moving the hing straps, adding more lumber, staining them, then re-attaching the hing straps in their "new and improved" locations. So much for being clever.


LESSON LEARNED: Field fence hinges need to be at least 6" from the top and bottom to work.


Here is a shot of the remainder of the run that I finished up over the last couple weeks. The posts have been set for a couple years, but I finally installed the top rail 2 weeks ago. Then my son Jacob helped me hang the remainder of the fence wire last weekend. I ended up about 6 feet short on the roll of fencing. I wasn't about to go buy another 330 foot roll, so last night I put an ad on Craigslist and this morning I got 3 calls from folks with leftovers that I could buy. So at lunch time today I picked up a piece just big enough to finish the job. I can't believe that it took me so long to fence one stinking acre. Oh well its done now.


You can see the hoop house I built for the meat chickens in the background, which I will cover in detail in an upcoming post.

Monday, March 5, 2012

Brooder Box Build

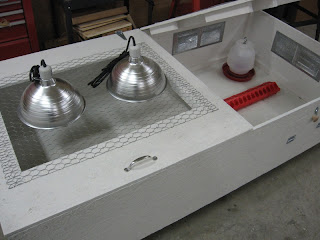
Here is the brooder box that I built for the chicks to live in for the first 3-4 weeks. The purpose of the brooder is to keep the chicks warm (as a brooding hen would do in nature) with a heat lamp, which will be suspended over the chicken wire lid on the left half of the box. The right side of the box will give the chicks a place to be away from the heat lamp if they get too warm, and will contain a feeder and water jar. The whole box will have about 3" of pine shavings on the floor for the litter. I painted it with Kilz primer for now so that it won't rot or swell and I can clean it out easier.


The materials, dimensions and design were mostly a product of what I had laying around. I wanted to make something that would be completely self contained rather than just a border on the floor. This will allow me to move it if necessary and not have to worry about curious dogs, children, etc.

The one consideration that I had to make was how big to make the box. I determined that 1/2 sq. ft. per chick should be sufficient for the first 4 weeks or so. With 50 chicks that means 25 square feet, which is 5 foot square. I had several pieces of 1/2" OSB about 3' x 6' from window cutouts on a construction job, so I ended up making the box 3' wide, 6' long and 16" deep. That's only 18 square feet so I hope there is enough room by the end of 3 weeks. Hopefully the chicks will feather out quickly.


Notice that I placed close-able vents on the right side of the box for added ventilation. I hinged the cutouts so that they can be closed up if it is too drafty. Again this is the product of what I had laying around. These are some soffit vents that I found in the shed and I have been saving those wooden knobs forever so it was time to use them.


The chicken wire on top of the lids was the leftovers from a 2' wide roll so that dictated the lid cutout to be about 20" (enough to overhang and staple the chicken wire 2" on each side). I didn't have any pieces of OSB left over that were big enough to make the lids out of so, I had to piece it together and put 1x2 pine braces underneath the joints (glued and screwed). Even if they were out of one piece I still probably would have braced it because OSB isn't very strong (and I over build everything, its a disease.)


I did  have to buy all the hinges and some other hardware. Unfortunately nobody seems to make hinges the way I wanted them. My lids lay on top of the box so an inside hinge would not provide enough clearance to open it. The wood is only 1/2"  thick so I couldn't use a piano hinge between the lid and wall without adding additional material to have something to screw it to. The strap hinges that I used work fine on the outside, but the screw holes were too close to the hing point as I needed an extra1/2" to miss the lid. Thus I ended up drilling another whole (for the screw below the empty hole) in each hinge. And the screws that came with the hinges are too long and needed to be replaced with some 1/2" long screws.


My father in his infinite wisdom keeps telling me to "put wheels on it". I keep telling him that it is a "table top" box that doesn't need wheels as it won't ever be on the ground and that it is light enough that I can move it by myself. Well I guess it could just as easily sit on the ground as it does on a table or saw-horses. But now that I have added lids and hardware, it is getting a lot heavier. Add pine shavings and 50 chicks and I think it will become a permanent fixture. Maybe I do need to add legs and/or some wheels. The real question is, where do I store this monstrosity when I am not using it?

[UPDATE]
Okay, so maybe wheels were a good idea. After moving this monstrosity in and out of and all around the garage every time I needed to build some thing in there I decided that dragging it around on saw horses was way worse than admitting defeat and adding some wheels. Since I still want the bottom to be flat I just built a large "movers dolly" for it to ride on. So far it works great.


Here is the finished product (sitting on the wheel dolly) with everything except pine shavings, and chicks.